Apple, ginger & gin upside-down cake

Baking with SpiritI’ve moved house since my last post.  I was only moving three minutes away, but given how much crap I seem to have accumulated on top of the ridiculous amount of stuff I already had, it turned into a feat of epic proportions.  I succeeded though, and have been busy settling in and discovering the quirks of my new kitchen (as well as trying to find the best light for photos – I’m still working on that one).  The first thing that I unpacked was all my baking paraphernalia, so that I could participate in this month’s Baking with Spirit, guest-hosted by Craig over at The Usual Saucepans.  He has challenged us to “Reinvent a Classic.”

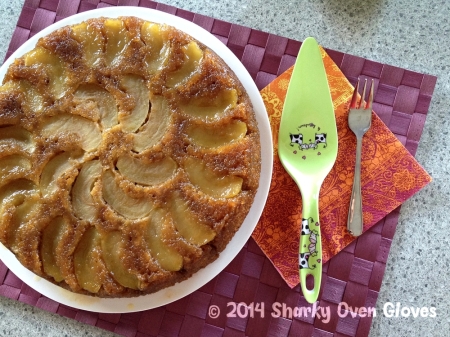
Apple, ginger & gin upside-down cake 1

Initially, I wanted to do something G&T-inspired – Craig and I first became friends after discovering a mutual love for gin, so it seemed appropriate.  I had a few ideas, but I wasn’t really feeling excited about any of them.  Then, as I was unpacking some bottles of ginger beer, it hit me.  Gin and ginger beer is a thing (well… I’m pretty sure it’s a thing.  Ok, I just looked it up and apparently it’s gin and ginger ale that’s a thing.  A thing called a Gin Gin).  A couple of years ago, I had spiced mulled gin served with apple juice and it was delicious (made by Craig actually – how fitting).  What if I made an apple and ginger upside-down cake with gin in it?

Apple, ginger & gin upside-down cake 2

So that’s exactly what I did.  There isn’t actually any ginger beer (or ginger ale) in the cake because I didn’t want to open a whole bottle just to use a little bit, but it’s represented by ginger and other spices.  I thought about making this with pears, but I happened to have plenty of apples and no pears, so that was that.  Like many upside-down cakes, this is definitely a make-the-day-before cake.  I tried some of the cake not long after baking and couldn’t taste the gin, but the flavour developed overnight and you could taste it the next day – it was subtle, but added something a little different to the flavour profile of the cake.

Apple, ginger & gin upside-down cake 3

Apple, ginger & gin upside-down cake

Serves 8-10
Adapted from A Treasury of New Zealand Baking

Firm apples that keep their shape when baking are key, as you don’t want them to disintegrate into mush.  The actual number of apples required obviously will depend on their size and the size of the cake tin.  I reckon the recipe would be equally delicious with pears rather than apples, or a mix of the two.  Whilst utterly delicious as a snack (or breakfast…), this cake would also make a wonderful dessert, served with whipped cream.  The cake is best eaten the next day so that the caramel can really soak in and the gin flavour can develop, and will keep for a couple of days in an airtight container.

Ingredients

For the cake:
225g unsalted butter, softened
275g light brown sugar
4 large eggs, room temperature
250g all-purpose flour
4 tsp baking powder
3 tsp ground ginger
1 tsp ground cinnamon
½ tsp ground nutmeg
¼ tsp ground cloves
Pinch of salt
2 tbsp gin
3 or 4 apples (I used Granny Smith)

For the caramel:
100g unsalted butter
130g light brown sugar
3 tbsp gin

Directions

To prepare the cake:
1.  Line the base of a 24 or 26cm round deep cake tin with baking paper.  Pre-heat the oven to 190°C/fan oven 170°C.

2.  In a large bowl, cream together the butter and brown sugar with an electric whisk until light and fluffy.  Beat in the eggs one at a time.

3.  Sift the flour, baking powder, spices, salt and gin into the egg mixture and stir together with a spatula or large spoon until just combined.

4.  Peel, core and cut the apples into eighths.  Set aside.

To prepare the caramel:
5.  In a small saucepan, melt the butter and sugar together to make the caramel.  Once the sugar has completely melted and the mixture is smooth, stir in the gin and pour into the prepared cake tin.  Arrange the apples over the top of the caramel, then cover with the cake batter, smoothing the top (it doesn’t have to be perfect).

6.  Place the cake tin on a baking tray large enough to catch any caramel that might bubble over the sides (much easier than cleaning a caramel-encrusted oven…) and bake for 50-55 mins until a skewer comes out clean.  Cool in the cake tin for about 10 mins before turning out onto a serving plate to cool completely.  The cake is best eaten the next day.

Enjoy!

Apple, ginger & gin upside-down cake 4

9 Comments

Filed under Recipes, Sweet Foods

Pear & almond tart

I wasn’t sure what to expect following my last post.  Actually, I didn’t think anyone would still be following Sharky Oven Gloves, so I wasn’t expecting much of a reaction at all.  Not only am I touched (and surprised!) by how many of you are still loitering and took the time to comment, it was also really encouraging to hear that I’m not alone in feeling frustrated with the state of affairs within the food blogging community.  Thank you for sticking around guys!

Pear & almond tart 1

With my usual knack for excellent timing, things went a little haywire right after I published that post.  Between a string of minor disasters at the lab, some slightly dramatic strife with somebody (and an apparent alliteration problem), the ensuing feeling of wretchedness, finding out that I have to move house in two weeks and starting to organise the details of that, I’ve had to divert my attention away from the newly revived Sharky Oven Gloves.  But I finally have a recipe for you today: pear and almond tart.

Pear & almond tart 2

The recipe this tart is based on neglected to specify the size of tin required…  So I guessed.  My guess was entirely based on the one size of tart tin that I happen to own, and that guess turned out to be wrong.  The pastry valiantly managed to contain all the filling, but only just.  I’ve ironed out the ratios and made a few other tweaks, resulting in a super scrumptious autumnal tart – pears scream autumn to me, and the almond filling makes the tart all dense and delicious and comforting.  Exactly what one needs to fend off the sudden, unwelcome appearance of winter this week.  As for the pastry, well, yum.  It’s a chocolate pâte sablée, which I always struggle to translate – I think it roughly translates to shortbread pastry.  The internet says “sweet cookie dough” which isn’t especially helpful.  Either way, its delicate chocolateyness works wonderfully with the pears and almonds.

Pear & almond tart 3

Pear & almond tart

Serves 8-10
Adapted from Tartes maison

The pastry can rest in the fridge for up to 2 days, so can be made the day before if time is a little on the tight side.  The recipe makes more recipe than required, but you could try freezing the leftovers or making a little extra tartlet.  The honey at the end is optional, but adds a little bit extra.

Ingredients

For the pastry:
200g all-purpose flour
65g caster sugar
50g cocoa powder
Pinch of salt
150g unsalted butter
1 egg
2 tbsp crème fraîche

For the filling:
120g unsalted butter, room temperature
120g caster sugar
½ tsp vanilla extract
2 eggs
200g ground almonds
4 tsp all-purpose flour
1 tsp ground cinnamon
3 large or 4 small pears
Handful of flaked almonds
3 tbsp honey (optional)

Directions

To make the pastry:
1.  Mix the flour, sugar, cocoa powder and salt together in a large bowl.  Rub the cubed butter into the mixture with your fingers until the mixture resembles breadcrumbs.

2.  Whisk the egg and crème fraîche together in a small bowl before adding to the flour mixture.  Mix together with a wooden spoon until the dough starts to come together.

3.  Lay out a piece of cling-film, turn the dough out onto it and form into a disc 18cm in diameter.  Wrap in cling-film and refrigerate for at least 30 mins and up to 48h.

4.  Pre-heat the oven to 200°C/fan oven 180°C.  Butter and flour a 24cm tart tin.

5.  Remove the pastry from the fridge and carefully roll it out on a lightly floured surface to a thickness of 3-4mm.  Carefully transfer it to the prepared tart tin by draping it over the rolling pin (it’s quite a fragile pastry, so delicacy is key here).  Cut off any overhanging pastry and prick the bottom with a fork.  If your kitchen is really hot and the pastry is starting to go soft and sticky, refrigerate the pastry for about 30 mins.  Otherwise, line it with baking paper, add baking beans and blind-bake it for 5 mins.  Reduce the oven temperature to 190°C/fan bake 170°C and blind bake for a further 5-10 mins, until the pastry is just firm.  Remove the baking beans.  Keep the oven at 190°C/fan bake 170°C.

To make the tart:
6.  Whilst the pastry is baking, prepare the filling.  Cream together the butter, sugar and vanilla extract until pale and fluffy.  Beat in the eggs one at a time, beating only until just incorporated.  Fold in the ground almonds, flour and cinnamon.  Set aside.

7.  Half the pears lengthwise, peel and core them.  If you’ve used three large pears, cut each half into four segments, if you’ve used four small pears, cut each half into three segments.

8.  Once the pastry is blind-baked, spread the almond filling evenly over the base.  Lay the pears over the top, gently pushing them in.  Scatter the flaked almonds over the top.  Bake for 30-35, mins until the filling is set and golden.

9.  Just before the tart is done, add the honey to a small saucepan and heat over a low heat until very runny.  Brush the honey over the top of the tart as soon as it comes out of the oven (it can be a little difficult not to displace the almonds), then allow the tart to cool in the tin for 10 mins or so, before turning out onto a wire rack.  Serve warm or cooled to room temperature.

Enjoy!

Pear & almond tart 4

2 Comments

Filed under Recipes, Sweet Foods

Guess who’s back, back again?

Mel is back!  Tell a friend.  And yes, I’m totally paraphrasing Eminem (13 year old Mel would be soooo proud – that song was the shit).  So anyway, hello there.  If anybody’s still there?  After six months of silence, I doubt anybody still follows Sharky Oven Gloves, but hey, one never knows.

Just in case somebody is still hanging around, desperately hoping that I might rock up again (because obviously, why wouldn’t you?), I do apologise for my abrupt and unexplained disappearance.  I wasn’t planning on taking such a massive blogging break.  Actually, I wasn’t planning on taking a break at all…

I started Sharky Oven Gloves because I wanted somewhere to gather together my favourite recipes, as well as an outlet for all my food chat.  Along the way I discovered the food blogging community.  And it was wonderful.  For a while.  About a year ago, I began to notice a few bloggers with a bit of a toxic attitude.  And I ignored it.  But that attitude began to permeate across the “blogosphere” and I became increasingly dispirited by how out-of-touch certain food bloggers sounded and by the number of reviews that were beginning to appear that were clearly just an avenue to get further freebies or of products completely irrelevant to food blogs (like… holidays or ferry routes, excuse me what?) that were beginning to appear.  In fact, it made me angry.

Quite frankly, I became so completely disenchanted that I decided to step away for just a week or so and take a few deep breaths.  But as more and more of those suspiciously-positive (a cynic might even say PR-arse-licking…) reviews clogged up my Feedly, my short break of a few weeks turned into a month… two months… and suddenly six months.  Oh.  Woops.  But that doesn’t mean that I haven’t been spending time in the kitchen – meals were still cooked, cakes were still baked and jam was still made.

Summery stone fruit cake

I just didn’t have the enthusiasm to blog about any of them – between taking photos, editing them and writing up posts, blogging eats up a lot of time.  And because my heart wasn’t really in it anymore, blogging became a chore.  Taking full advantage of it being summer and living in a coastal idyll was a much more inviting use of my time.  Also the whole PhD thing.

Surfing in Waipu Cove

Over the last few months, I’ve made some changes – I’ve unfollwed those toxic bloggers, which I should have done sooner.  Way sooner.  For some reason, I felt that I should follow the big bloggers because they were important in some way.  Well guess what?  They’re not.  I’m not saying that because I’m a tiny little blogger, but because following a blog that irks me is not healthy, and I don’t gain anything good from it.  At all.  (Rocket science, I know.)  Consequently, I’ve been looking for blogs written by lovely, genuine people.  I’ve found several really great NZ-based blogs, but all suggestions of other blogs to check out are welcome!  I also feel revitalised, and once I’m back into the swing of things properly, I’m going to try to get more involved in the NZ food blogging scene.  Because it just makes sense – lovely people in the same country as me = no-brainer.

So there you go, a little explanation of my sudden disappearance.  No recipe today, but look out for one next week.

In the meantime, enjoy the rest of your day, wherever you are in the world!

Pancakes!  Brunch for the win.


11 Comments

Filed under Ramblings

Bringing back childhood food memories

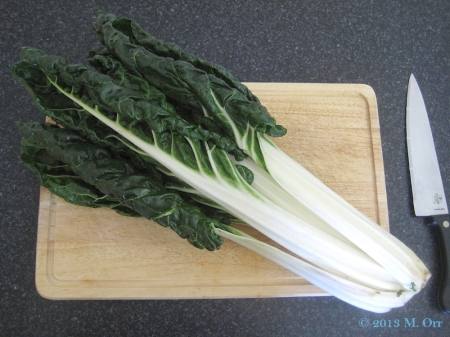
During summer visits to my French grandparents when I was little, I’d always get excited when my grandfather brought in a big bunch of silverbeet (côtes de bette) from the garden.  It meant one thing: silverbeet gratin was in my future.  My grandmother wasn’t exactly an imaginative cook, but in this case, that was absolutely fine by me.  Silverbeet gratin is one of my favourite childhood food memories.  Perhaps because we only ever got to eat it once or twice a year – silverbeet wasn’t available in any of the countries I grew up in – and that made it magical to little Mel.  By the way, this is what I mean by silverbeet:

Silverbeet

I think it’s similar to what is called chard in the UK, but I’m not convinced that it’s exactly the same thing.  When my grandmother was no longer able to cook for herself, my yearly summer silverbeet gratin treat was suddenly restricted to my memory.  Until I moved to NZ last year and discovered that silverbeet exists here.  I was embarrassingly excited about it and promptly made silverbeet gratin.  And proceeded to make one a week for about a month.  Just because I could.  (Balanced diet, woop!)

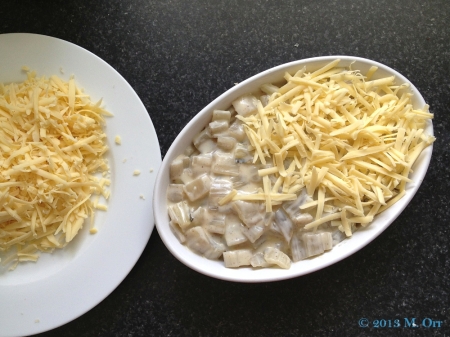
Silverbeet gratin 1

To be honest, this is barely a recipe – it’s literally a case of cooking the stems, mixing them into a béchamel sauce, topping the whole thing off with cheese and grilling it until bubbly and golden.  Boom, simple as.  The recipe quantities are more guidelines than set in stone.  I never usually measure anything out when I make a béchamel, so doing so to write up the recipe was a bit of a novel experience.  I apologise for the slightly uninspiring photos by the way – I was more focused on actually eating the gratin.

Silverbeet gratin 2

Silverbeet gratin

Serves 2-3 as a light meal, 3-4 as a side dish
Recipe by Sharky Oven Gloves

Although the silverbeet leaves aren’t used in this recipe, don’t throw them out – they work interchangeably with spinach in many recipes (although be warned that they are slightly more bitter).  Comté cheese is the best cheese to use, but if you can’t get it (or it’s prohibitively expensive), gruyère will also do the trick.  The gratin can be served as a side dish alongside meat, or by itself as a light meal, accompanied by a side salad.

Ingredients

1 bunch silverbeet (about 900g)
½ lemon (optional, helps prevent slight browning)

For the béchamel:
50g unsalted butter
2-3 heaped tbsp all-purpose flour
200-250ml whole milk
Salt and freshly ground black pepper
½ tsp ground nutmeg

150g comté or gruyère

Directions

1.  Wash the silverbeet, trim the leaves from the stalks (you won’t need the leaves, but keep them as they can be used for other things).  Slice the stalks into 1-1.5 cm slices.

2.  Bring a large saucepan of salted water to the boil, add the silverbeet slices and the juice of the half lemon.  Cook for about 20 mins, until a knife point easily slides into the stalks.

To prepare the béchamel:
3.  Pre-heat the oven to a hot grill setting.

4.  Meanwhile, make the béchamel.  Melt the butter in a medium saucepan.  Add 2 heaped tbsp of flour and stir until smooth.  Add more if necessary, but a little at a time, ensuring that it remains smooth.  Stir in the milk about 50ml at a time, constantly stirring and allowing the sauce to thicken before adding more.  Season with salt and freshly ground black pepper and the nutmeg.

5.  Drain the silverbeet, and add to the béchamel sauce (or add the sauce to the silverbeet, depending on the size of your saucepans) and stir together.  Pour into an ovenproof dish, and top with grated comté or gruyère.  Grill until the cheese is melted and browning.  Serve immediately.

Enjoy!

1 Comment

Filed under Recipes, Savoury Foods

Tuesday Tutoring… on a Wednesday

Just a quick post to say that the lovely Javelin Warrior has featured me as his Tuesday Tutor today.  Which is Wednesday, I know, but yay, time zones, it’s still Tuesday in the US.  Anyway, I digress.  Javelin Warrior is one of the genuinely loveliest bloggers out there, so I was delighted when he asked me to get involved with the series.

I feel a bit sorry for the tomato with no stem - it's the odd one out.  But it's not like tomatoes have feelings, so it's all good (in the hood).

He decided to try out my baked beef-stuffed tomatoes which is one of my favourite savoury recipes ever because A) my mum always made stuffed tomatoes in the summertime, so they remind me of growing up and summer holidays, and B) they’re super delicious.  Simple as that.  It’s not quite tomato season here yet, so I have to wait a little while longer to make my own, but I’m starting to grow rather impatient!

Anyway, you can read Javelin Warrior’s thoughts on and step-by-step guide to the recipe here.  I love that he used different coloured tomatoes – so pretty!  And I’m intrigued by his suggestion of adding cheese, because, well, cheese.  Enough said.

Enjoy the rest of your day, wherever you are in the world!

2 Comments

Filed under Ramblings, Savoury Foods

Sticky lemon & ginger muffins

The lab was a glum place to be on Thursday after that last gutting America’s Cup race.  Actually, NZ was a glum place to be.  Except, presumably, the place in Warkworth where most of the Oracle USA boat was built.  So Team NZ was beaten by a boat largely built and designed in NZ…  Totally not awkward at all, nope.  Anyway.  It’s depressing, so let’s not dwell on it too much.  My actual point is, we were all feeling a bit sulky.  And the solution to that is… cake.  Obviously.  Come on, this is a food blog.  Food is always the answer.

Sticky lemon & ginger muffins 1

Random RecipesI wasn’t sure what I wanted to bake.  Luckily though, Dom has set the theme of puddings, cakes and bakes for this month’s Random Recipes, so that conveniently bypassed the whole issue of indecision.  I randomly picked out A Treasury of NZ Baking, and randomly opened it at page 78: crunchy lemon muffins.  Oh hello…  After coming down with a cold over the weekend and being given lemons by several lovely people, I have plenty to use up.  Inspired by all the hot toddies that I’ve been making with said lemons, I added some ginger to the muffins.  I considered adding whisky, too, but decided to save that experiment for another time (I totally didn’t get distracted and forget).

Sticky lemon & ginger muffins 2

They didn’t come out very crunchy.  As in, they didn’t come out crunchy at all.  I’m not entirely sure why, but I’m guessing it’s something to do with the glaze, which certainly made them sticky – perhaps too much of the sugar dissolved in the lemon juice or our house is too humid and the crunch was lost.  Despite that, they were utterly delicious and lemony, which I love, with a hint of ginger poking through.  So I’ll definitely be making them again.  Especially since they’re also super quick to prepare – start to finish only took about 40 minutes.  Amazing or what?

Sticky lemon & ginger muffins 3

Sticky lemon & ginger muffins

Makes 15 muffins
Adapted from A Treasury of New Zealand Baking

Avoid using muffin liners as I think they’ll just go soggy from the glaze – silicone moulds or directly baking in the muffin holes are the way forward.  These are best eaten within two days, either warm or room temperature.

Ingredients

For the muffins:
75g unsalted butter
250g all-purpose flour
175g caster sugar
2 tsp baking powder
1 tsp ground ginger
Pinch of salt
250ml milk
1 egg
Zest of 2 unwaxed lemons

For the glaze:
60ml freshly squeezed lemon juice
60g caster sugar

Directions

To make the muffins:
1.  Preheat the oven to 220°C/fan oven 200°C.  Set out 15 silicon moulds or butter 15 holes in muffin tins.

2.  Melt the butter in a heatproof bowl over a pan of simmering water.  Remove from the heat and allow to cool a little.

3.  Meanwhile, sift the flour, sugar, baking powder, ginger and salt together into a large bowl and whisk together with a fork.

4.  Add the milk, egg and lemon zest to the bowl of butter and whisk together with a fork.  Add to the bowl of dry ingredients and fold through with a metal spoon until just combined (you don’t want the mixture to be super smooth and traces of flour is good).  Add a heaped spoonful of batter to each muffin mould or hole.  Bake for about 12 mins until lightly browned and the tops spring back when lightly pressed.

To make the glaze:
5.  Whilst they are baking, add the lemon juice and caster sugar to a small bowl.  Don’t mix.

6.  Once the muffins are out of the oven, brush the tops with the glaze using a pastry brush.  Try not to stir the glaze to minimise the sugar dissolving.  Repeat until all the glaze is used up.  Allow the muffins to sit in their moulds/tin for 5 mins before lifting them out onto a wire rack to cool.  Serve warm or cooled to room temperature.

Enjoy!

12 Comments

Filed under Recipes, Sweet Foods

Pork sausage & cider crumble

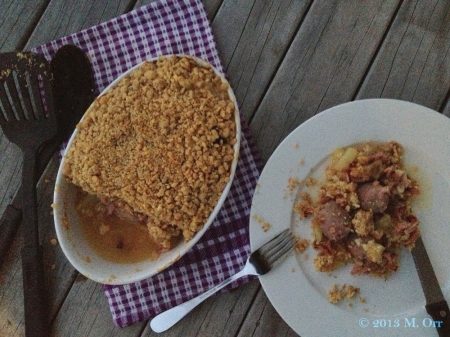
Food photography 101 goes something like this: pretty food + natural light + proper camera = mouthwatering photos.  The formula for this post’s photos went more like this: unpresentable food + rapidly fading natural light (aka half dark) + iPhone = photos that not even Photoshop can redeem.  I more or less set myself up to fail though.  Crumble isn’t the easiest thing to serve up and the resulting mess is generally not very photogenic, particularly when there’s meat involved and everything is varying shades of brown.  Oh and I also wanted to eat dinner at a vaguely normal time, which happens to coincide with sunset at the moment, instead of 17h when the light would have been good.  Shocking, I know.

Pork sausage & cider crumble 1

I came down with one of those feverish change-of-season colds over the weekend, so I was feeling a bit sorry for myself and craving comfort food.  The classic combination of pork and apple had been playing on my mind, but I didn’t quite feel up to faffing around with pastry and making a pie.  So I threw together a pork sausage & cider crumble instead, as you do.  It sounds totally fancy-pants, but it’s ridiculously easy and makes for a hearty main course.  Despite its appearance, it also happens to be totally delicious – with bacon strips, apple pieces and lashings of garlic also chucked in there, how could it not be?

Pork sausage & cider crumble 2

Baking with SpiritCider is the special ingredient for this month’s Baking with Spirit, so I’m submitting this crumble to Janine over at Cake of the Week, who launched this genius challenge a year ago!  (A year already?  What?!)  If you’ve a sudden inspiration to bake something with cider, whether sweet or savoury, I think you’ve got until Saturday to enter.

Pork sausage & cider crumble 3

Ya, I don’t really want to talk about that photo.

Pork sausage & cider crumble

Serves 3-4
Recipe by Sharky Oven Gloves

There’s a lot of room for adjustment in this recipe.  Use whatever good quality pork sausages you feel like – pork and fennel?  Go for it.  Pork and apple?  Sounds amazing.  I used a pretty light-flavoured cider because that’s what we had at home, but a heavily-flavoured cider would probably be even better.  Use your favourite kind of cheddar, as long as it’s flavourful.  If you think the cider is still too liquidy before adding the crumble, sprinkle a little flour over the top first.

Ingredients

For the filling:
100g bacon strips/cubes/lardons
4 cloves garlic
Drizzle extra virgin olive oil
4 pork sausages (about 370g; I used Black Rock traditional pork sausages)
1 apple (I used Braeburn, Granny Smith would also be good)
Black pepper
About 250ml cider (I used Boundary Road Brewery Honesty Box cider)

For the crumble:
65g cheddar (I used Kind Island Surprise Bay cheddar)
75g unsalted butter, softened
70g wholewheat flour
45g all-purpose flour
2-3 sprigs of thyme
Salt & black pepper

Directions

Prepare the filling:
1.  Preheat the oven to 220°C/fan oven 200°C.

2.  Remove any huge bits of fat from the bacon strips/cubes/lardons.  Peel the garlic gloves and finely dice.  Heat the olive oil in a frying pan over a medium heat, add the bacon and garlic and fry until golden.

3.  Meanwhile, cut each sausage into 4 rounds and place standing up in an ovenproof dish with a little space (about 1 cm) between each piece of sausage.  Scatter the garlicky bacon between the sausage rounds.  Peel and dice the apple into the 1cm pieces, and scatter over the top of the bacon, between the sausages or over the top, depending on how much space you have in your dish.  Season with freshly ground pepper, then pour the cider over the top, stopping 1cm from the top of the dish.

4.  Bake for 25-30 mins, until lightly browned on top.

Prepare the crumble:
5.  Meanwhile, prepare the crumble.  Roughly grate the cheddar into a medium-sized bowl.  Cube the butter into the same bowl, followed by the flours and some salt and freshly ground pepper.  Wash and dry the thyme sprigs, then strip the leaves, adding them to the bowl.  Rub the mixture together with your fingers, until the mixture resembles breadcrumbs.

6.  Sprinkle the crumble mixture over the top of the filling, then bake for a further 30-35 mins, until golden and a little crispy on top.  Serve immediately, accompanied with a side salad and a glass of cider.

Enjoy!

2 Comments

Filed under Recipes, Savoury Foods

Silverbeet & feta quiche

It’s that weird inbetween season where the winter vegetables are coming to the tail end of their season, but the summer vegetables haven’t yet made an appearance.  Well, that’s not quite true – I saw courgettes at Nosh yesterday… priced at a casual $19 a kg.  I love courgettes, but not quite that much.  Silverbeet, however, seems to be in season all year round here.  From what I understand it grows wonderfully in the climate here, well, here in northern NZ anyway.  I think it’s called different things in different places, so this is what I mean by silverbeet:

Silverbeet

This whole always-in-season thing is rather marvellous because I love silverbeet.  Well, specifically the stems, which I will post about later.  I’m sort of doing this backwards, I should really post about the stalks first and why I love them so much (clue: there’s cheese involved).  But instead, I’m going to talk about the leaves.  They’re super bitter, so I wouldn’t eat them raw, but when it comes to cooking them, you can generally use them interchangeably with spinach.

Silverbeet leaves

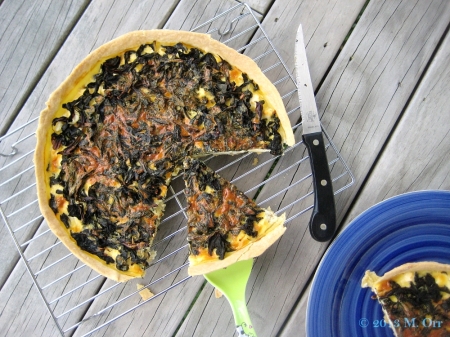
I had a bunch of silverbeet leaves to use up, so I decided to throw them into a quiche with some feta.  Quiches are the best way to use up leftovers or ingredients loitering in the fridge.  Throw some ingredients together, beat together a couple of eggs and some crème fraîche, throw them all together in a pastry-lined tart tin, and boom, a fancy-pants vehicle for leftovers that’s actually insanely easy to prepare.

Silverbeet & feta quiche 1

AlphaBakesBonus: any leftover quiche can be eaten cold for lunch (or warm for lunch, that works, too).  Basically, quiche is a winner.  This silverbeet and feta quiche is definitely a winner.  It’s pretty light, perfect for lunch or a starter.  Since it’s not totally filled with eggy mixture, the silverbeet leaves on the top go all crispy in the oven.  Scrumptious!  I’m submitting this quiche to September’s AlphaBakes, where the special letter is “Q.”  The challenge is being hosted by Caroline Makes this month.

Silverbeet & feta quiche 2

Silverbeet & feta quiche

Serves 4-6 as a starter, 3 as a main course
Recipe by Sharky Oven Gloves

This would work equally well with spinach leaves, and feel free to throw in some toasted pine nuts if you have some (unfortunately I didn’t).  This quiche is delicious either warm out of the oven, or cooled down to room temperature and makes an excellent light meal or starter.  If you want a more filling quiche, add more feta and silverbeet leaves, or add another egg and some more crème fraîche.  This recipe is pretty flexible, so knock yourself out (not literally, please).

Ingredients

1 quantity of quiche pastry of your choice (I used this recipe)
200g silverbeet leaves
3 cloves garlic
Drizzle extra virgin olive oil
1 heaped tsp Dijon mustard
250g feta
3 eggs
175g crème fraîche
Salt and pepper

Directions

1.  Butter and flour a 24cm fluted tart tin.  Make your pastry, roll it out and line the tart tin with it.  Prick the pastry with a fork.  Refrigerate for at least 30 mins.

2.  Meanwhile, preheat the oven to 200°C/fan oven 180°C.

3.  Wash the silverbeet leaves, pat them dry and slice them widthways in about 1cm strips (it doesn’t have to be perfect, we’re making quiche here).  Peel and finely mince the garlic cloves.

4.  Heat a drizzle of oil in large frying pan over a medium heat.  Add the garlic and sauté for 1-2 mins.  Then add the silverbeet leaves.  I generally add half the leaves and allow them to wilt for a couple of minutes before adding the remaining leaves to the pan.  This helps to prevent silverbeet overflow.  Cook until thoroughly wilted and reduced.  Set aside to cool a little.

5.  Remove the pastry from the fridge.  Spread the mustard thinly over the base, then evenly crumble the feta over the top.  Evenly spread the garlicky spinach over the top of the feta.  In a medium bowl, lightly beat together the eggs, then whisk in the crème fraîche and season with salt and pepper (you won’t need much salt since feta is usually quite salty).  Pour over the top of the spinach.

6.  Bake for 50 mins to 1h, until golden and cooked through.  Allow to cool in the tin for about ten mins before serving or transferring to a wire rack to cool.

Enjoy!
4 Comments

Filed under Recipes, Savoury Foods

Grapefruit curd

You guys, it’s spring!  Spring officially started on the first of September here in NZ, and you know what that means?  It’s baby animal season!  There are loads of lambs gambolling around in the fields.  There are fuzzy calves aplenty, too.  I don’t know if fuzzy calves are a NZ thing (I’ve no idea what breeds are farmed around here) or if I just haven’t paid much attention to the calves in other countries.  Either way, they’re adorable.  All of the baby animals in the fields are adorable.

Tawharanui lamb pile

So cute!  We came across those little specimens of fluff during a mini-hike through Tawharanui last week.  In other news (super smooth segue alert), we finally got through our mountain of grapefruit.  Huzzah!  Today’s grapefruit-themed recipe is for grapefruit curd.  Curd is a great way of using up any citrus surplus, and super easy to boot.  It just needs a bit of babysitting and continuous stirring until it’s done.  So drinking a shedload of tea beforehand isn’t recommended, because you can’t really abandon the hob mid-curd-production.  Not that I’m speaking from experience or anything.

Grapefruit curd 1

Once it’s done, cooled and set, you can do a tonne of stuff with curd, including eating it straight from the jar with a spoon.  If you have any left after “quality control,” it’s an excellent addition to baked goods (think sandwich biscuits, macarons, etc.) or spread on crumpets or toast.  It also makes a wonderful filling for some blind-baked pastry cases, especially topped with a dollop of whipped cream and eaten for breakfast whilst watching Team NZ smash the US during one of the America’s Cup races (because they’re on at breakfast time for us – thank you time zones).

Grapefruit curd 2

Grapefruit curd

Makes enough to fill about two 350ml jars
Adapted from my lemon curd recipe

I used yellow grapefruit, but this would work equally well with pink grapefruit.  To sterilise the jars, wash in hot soapy water, rinse thoroughly and dry in an oven pre-heated to just over 100°C.  The curd will keep for about a week in the fridge (possibly longer, but I’ve never had a batch remain uneaten for more than a couple of days). 

Ingredients

2 large or 3 medium grapefruit (yellow or pink)
1 small lemon
4 eggs + 2 egg yolks
110g butter
220g caster sugar

Directions

1.  Juice the grapefruit and lemon into a small bowl or jug.  In another small bowl, beat the two eggs and the egg yolk together well.

2.  Melt the cubed butter in a large heat-proof bowl over a simmering pan of water (make sure that the water doesn’t reach the bottom of the bowl).

3.  Add the sugar and the zest and juice from the grapefruit and lemon, followed by the eggs.  Stir the mixture carefully and constantly with a spatula, making sure the mixture doesn’t boil.  Once the mixture coats the back of the spatula (turn the spatula flat and run your finger through the mixture coating it – if you can draw a line through the mixture and it doesn’t re-fill, then it’s done), remove from the heat.

4.  If using the curd straightaway, pour into a bowl, otherwise, pour into sterilised glass jars.  Allow to cool (it will thicken further) before sealing and storing in the fridge.

Enjoy!

Grapefruit curd breakfast tartlets

A winning breakfast, right there.

6 Comments

Filed under Recipes, Sweet Foods

Grapefruit galore!

We’ve accidentally ended up with a glut of grapefruit at our house.  Somebody brought a whole bucket in to the lab the other day and one of my housemates and I got a bit carried away when we grabbed some (there were plenty left for everybody else though).  Then my other housemate turned up yesterday evening with even more grapefruit.  Don’t be surprised if there’s a bit of a grapefruit theme over the next week or so…

Mini mountain of grapefruit

Baking with SpiritThe great thing about grapefruit and other citrus is that although they’re winter fruit, they always makes me think of summer, they bring zingy little rays of sunshine to any wintery proceedings.  Spring officially starts on Sunday, so we’re nearly done with winter here and summer is definitely on its way, but I’ll still take anything with a hint of sunshine that I can get.  Except mosquitoes – I killed my first one of the season this morning.  Not cool. Anyway, I digress.  Janine over at Cake of the Week has chosen “Summer” as the theme for this month’s Baking with Spirit challenge.  Now the most summeriest of drinks is, of course, Pimm’s, but I don’t have any at the moment and none of the accompanying fruit are in season here.

Sugar cookies with grapefruit & gin glaze 2

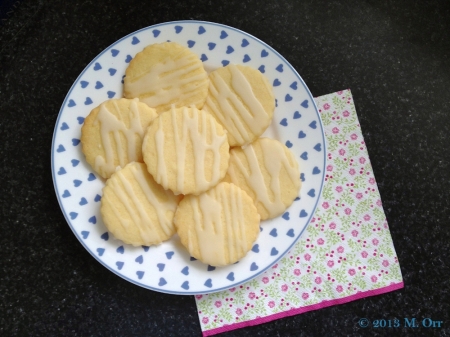
As I was looking at our literal mini-mountain of grapefruit I decided that perhaps I should do something citrussy as my “summer” entry.  I’m going for the winter version of summer.  Did you know that grapefruit and gin go wonderfully well together?  I didn’t know that until last night (thank you Flavour Thesaurus).  I decided to make simple sugar cookies – the catharsis of rolling out cookie dough appealed to me – with a grapefruit and gin glaze.  The cookies came out a bit softer than I was expecting, but are rather delicious – the zing of the grapefruit and subtle hint of gin in the glaze really make them.

Sugar cookies with grapefruit & gin glaze 3

Sugar cookies with grapefruit & gin glaze

Makes about 50 cookies
Cookies slightly adapted from Glorious Treats
Glaze by Sharky Oven Gloves

Rolling these out can be a bit of a faff, but you want to minimise the amount of flour that you add.  These cookies keep their shape really well when baking, so feel free to use whatever fun cookie cutters you have.  I used orange grapefruit, but I’m sure red grapefruit would work wonderfully as well.  You won’t need all the juice from the grapefruit that you take the zest from, so you might as well just drink the rest.  Ideally with a slug of gin.  I definitely recommend the combination!  These cookies will keep for a couple of days in an airtight container.

Ingredients

For the cookies:
375g all-purpose flour
1 tsp baking powder
Pinch of salt
225g unsalted butter, room temperature
200g caster sugar
1 egg
1 tsp vanilla extract
Zest of 1 grapefruit

For the glaze:
200g icing sugar
2 tbsp gin
2 tbsp freshly squeezed grapefruit juice

Directions

To make the cookies:
1.  Sift the flour, baking powder and salt into a medium-sized bowl and stir together.

2.  In a large bowl, cream together the butter and sugar with an electric whisk until light and fluffy.

3.  Add the egg, vanilla and grapefruit zest and whisk together.

4.  Whisk in the flour a little at a time.  Once it has all been incorporated (it will be rather crumbly), knead together with your hands to form a dough.  Wrap in cling film and either refrigerate for about 2h or pop in the freezer for 20-30 mins (make sure it doesn’t harden otherwise you’ll have to wait for it to thaw).

5.  Line a couple of baking trays with baking paper.  Pre-heat the oven to 195°C/fan oven 175°C.

6.  Take half of the cookie dough (if it’s been in the freezer, transfer the remaining dough to the fridge) and either roll it out between two sheets of baking paper or roll it out on a lightly floured surface with a sheet of baking paper over the top.  (This is to minimise the amount of extra flour added.  I did it the first way, which was a bit of a faff but did work, you just have to anchor the bottom sheet.)  Roll the dough out to a thickness of 4-5 mm.  Cut out rounds of dough using your chosen cookie cutter (I used a 6cm scalloped round cutter) and place on the prepared baking trays, about 2cm apart.  Pop the baking tray in the freezer for 5 mins before baking for 8-10 mins, until just starting to turn golden.  Leave the cookies on the tray for about 1 min before transferring to a wire rack to cool completely.

7.  Repeat with the remaining cookie dough and leftover bits.

To make the glaze:
8.  Once the cookies are completely cooled, make the glaze.  Sift the icing sugar into a small bowl, add the gin and grapefruit juice and whisk together by hand.  Pour the glaze into a zip-lock bag, snip a tiny corner off and drizzle over the cookies (I usually set paper towels underneath the wire racks to catch and dribbles of glaze).  Allow to set before arranging on a plate or transferring to an airtight box.

Enjoy!

2 Comments

Filed under Recipes, Sweet Foods